W2D VI: 3D Printed Truck Body Build Guide


BOM link (Bill of Materials)
You can use a lot of my past stuff with this project so feel free to explore my Thingiverse. Here's a few of the big items:
W2D-VI version 1: https://www.thingiverse.com/thing:4903157
W2D-VI version 2 (This truck): https://www.thingiverse.com/thing:5276273
Jeep Cage (pretty compatible): https://www.thingiverse.com/thing:4610573
Jeep Body (seats): https://www.thingiverse.com/thing:4671977/files
YouTube Video: https://www.youtube.com/watch?v=BUi60u7aqNE
I mention "welding" a lot. Welding means using a 3D Printing pen as a plastic welding tool pretty much just like welding metal. Hot glue, welding and electrical tape are my best friends when it comes to assembling body parts. Tacking something together means using a couple of dabs of hot glue or plastic welding to temporarily hold the parts together. If you mess up it is easy to grind off the weld or peel off the hot glue. If the fit is good, weld the whole thing together. When in doubt, practice on some junk parts. The 3D pen can fit into every corner, so think about your plan of attack before committing; that said, I didn't screw myself and I was just winging it as I went along. The hood and topper are the most likely spots to have problems because they close up boxes and make corners harder to reach.
Glue smoothing means brushing on one or more coats of white glue to smooth out layer lines from the 3D printing process. Note that white glue is not water proof so submerging the body in water may be a problem. Also, the glue layer can be peeled off (try it on a scrap part) so there is a lot of potential for damage if you go the glue smoothing route. I don't think it's much worse than any body with paint on the outside because RC cars can really mess up a hard body paint job in a hurry if you crash or bash into things a lot. If you wanted to go crazy, a plastic paint like Endura would probably give a really durable finish but you would need the equipment to spray it. I've also been meaning to try that rubber stuff (what's it called again?) but haven't gotten around to it. Layer lines are the headache...
I use a cordless rotary tool for grinding and a full power rotary tool for cutting. The little cordless one can cut but it lacks the power and RPM of the big boy so patience is needed. A full sized rotary tool can do damage heating and whatnot, so use more caution then with a small one.
The paint is used was Behr two in one paint and primer. It works well because it lays down nice thick coats.
You will want to test fit all the mating surfaces and sand them perfectly flat if needed.
BIG WARNING, I'm still fiddling with the body mounts, so you may need to do a bit of tweaking. Anything I do will be attached to the finished body so stay tuned. The most likely part to change is the bumper mount that bolts to the chassis (I think). Not that big of a deal IMO. The problem I've just had to deal with is that the body is slightly longer in reality than in CAD. This means that without an easy way to tweak the mounts slightly it's tricky to fit. I think that TPU posts will give enough flex to accommodate the variation I just don't have any TPU at the moment so testing that notion will have to wait. Bottom like, if you print the mounts that attach to the body out of TPU I think you will be fine.
You will want to decide if you will be using fenders with flares built-in (one-piece) or adding flares after or not using flares at all. I welded on the flares after painting and it worked out pretty well (I wanted different color flares and adding them after meant no masking). The only thing I'm not sure of is how much the paint/glue messed up the welds because I made no effort to clean the under sides. I wanted to see how bad the worst case is. So far, the flares weld joints don't creak and haven't just snapped off so the mix of paint glue and plastic doesn't seem to be a huge problem. Stay tuned, I will share if I live to regret my blasphemy.
The general idea when assembling this is to build the rectangular box structure and then build onto it. I put together the nose and front quarters and then fitted the hood. As I mentioned in the video, the hood fit was slightly askew due to my shoddy workmanship and it affected the whole thing slightly; the fit problem is a minor issue with the roof being crooked and having to tension it slightly into position. Bottom line, the part you need to be careful with is the hood. Everything else is pretty forgiving. I didn't go crazy trying to make things straight and mine didn't turn out bad at all. Lie the parts down on a flat surface when possible so you can tack it together nice and square and you should be OK. My mistake with the hood was not realizing that I could make hot glue ledges to hold it flush to make the "welding" easier and then I got impatient and just said ef it and welded it on. If you spot something shoddy you can bet getting impatient was the cause.
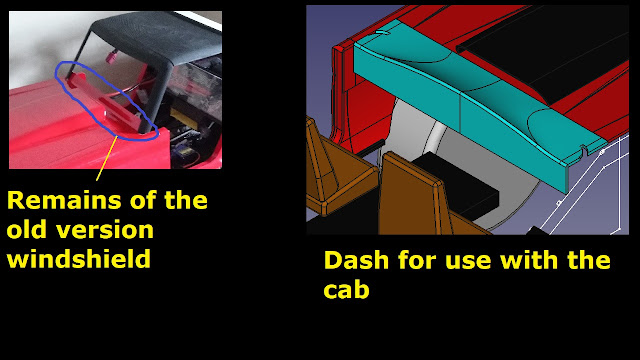
Next, I added the old version simple windshield (I added the cab later and the "dash" you see in the pics is the remains of the old version windshield after I cut off the top). If you are going with the cab version of the truck I would put in the dash at this stage (be sure to use the one with slots for the cab).
Next, I assembled the door and rear quarter panel sections. Lie them down on a flat surface to get them straight.
Then, I attached the back sections of the sides to the front section. I just used the pins and glue method but all you have to do is tack the sides and weld if you got them straight.
Finally, I attached the tailgate to finish the rectangle.
I'm not saying that's the best way, that's just the way I did it.
I put in the mounts for the topper later but if you want to use the topper I would suggest building it and installing the "U" brackets before painting the body. I attached the posts to the topper and then kinda held it in place and fudged in the brackets. It was a bit of a pain and looks ugly but it works fine. The problem I see with mounts printed into the parts is that any error in body or topper assembly makes them not line up nicely. There are lots of other ways to fit the topper, this is just the method I used. Obviously, you can do something slicker if this offends you the way it should.

Next, I glue smoothed the main part of the body and painted it. You might want to assemble and install the cab and whatever other custom bits you want to use if you are going with one color for the whole truck. For what it's worth, I think it is very doable to install the cab after painting the main body and not cause any carnage. You are only going to have to weld the front tabs from the bottom and the sides to the top of main body sides above the doors.
OK, this is where it gets interesting because there are a lot of different ways to finish this thing off.
I put on the roll bar because I was playing around with the look. I had the notion in my head that an SUV style, open front to back interior might be good. The open back version of the cab that I built works with that notion. The topper can be on or off. The full cab version is like a conventional pickup truck. The only problem I haven't really worked out is the lower portion of the back of the cab because the box isn't separate like it should be and because for a TRX4 there needs to be a cutout for the battery. I figure that's easy enough to deal with on your own.
Bottom line, the first version of this works great if you want to go full open top with a roll cage. The cab and topper setup works pretty well if you want an SUV look. There are a lot of pretty easy ways to tweak it to make it your own.
Finally, I'm still farting around with the body mounts. Stay tuned for more information.
TRX4 Chassis Info
I started out mocking it up by taping the pieces together and testing fit on the TRX4 chassis with the G500 fenders and floor installed. The G500 fenders and floor fit really well but the 70s Bronco ones are significantly wider and would need to be trimmed, and I suspect the Chev ones are too. I believe the Scale and Trail (S&T) Bronco is narrow like the G500 but I'm not 100% sure so if anyone knows for sure slap a comment up on this or the YouTube video (I check comments on YouTube a lot more often). I did some hacking on my G500 inner fenders in the building and fitting process so I'm not 100% sure if the latest version fits absolutely 100% but worst case you would need to grind off the lip on one or both ends not much or any of the actual bucket part.
Comments
Post a Comment